|
|
|
Hydraulic Front Brakes
Contrary to what most people will tell you, Blasters can be converted to hydraulic front brakes. Banshee/Warrior Hubs, disks, master cylinder, and calipers are used. Brakets are needed to bolt the Banshee calipers to the stock Blaster's spindles. A spacer is needed to keep the hubs in the correct position. The bolt pattern for the Banshee hubs are the same as the Blaster's, so your current wheels will fit. Banshee and Blaster front wheel bearings are also the same.
My project started in late May when I found someone who had Banshee front brakes for sale. He was converting his quad to be a drag racer and removed the front brakes. They were in excellent condition (came off a new 2000) and the master cylinder was chromed. I got the front hubs from K and K ATV. They were in OK condition, so I painted them red, and replaced the wheel bearings with new ones.
The next problem was the spacers. They keep the hubs from rubbing aginst the spindle, and they help to keep the grease from coning out of the wheel bearings. I was able to find some 1" OD pipe that would do the job. After cutting it to the right length, I had my spacers.
Then came the brackets. I had seen a few pictures of the old Scott's kit (no longer made) and I modeled my design after that. I made templates for the brakets out of aluminum (will post pics when I get a chance), and took these to a welding shop to have them made out of stronger steel.
Update 7-6-00: The brackets have been made out of 1/4" steel, and all the holes have been drilled. I still have to get the brackets welded, that will be done tomarrow.
The custom steel braided brake lines arrived, as did all of the bracke fittings. The hubs have been painted red to match the plastic, and new wheel bearings and seals have been installed.
The whole project should be completed by Friday, and I'll give it a test run, and shoot some pics at that time.
Update 7-10-00: They are finished!!! I got the brackets back, painted them, and got it all assembled Thursday. It didn't work perfectly at first, and some adjustments were nessicary (the calipers were not exactly parallel to the disk). Once the problem was fixed, it was time for the ride test.
They work extremly well. The brakes have enough power to lock the brackes at any time, but they are very easy to modulate. I have only put about 20 miles on them so far, but it looks like they will work very well.
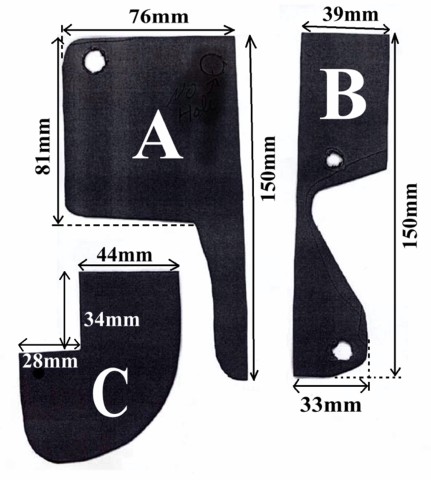
Below are a few diagrams of the brackets. I took a few pictures of the brakes Sunday, and they should be online by Friday the 15th.
Hopefully that will give you an idea of what the brackets look like.
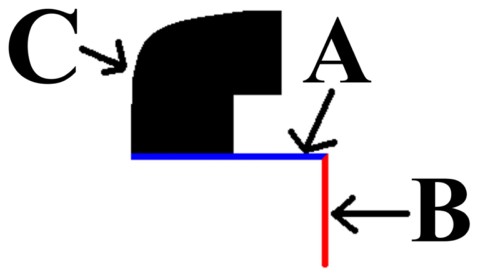
A and B are actually one piece of angle steel. C is a seperate piece welds to A. The holes you see are not perfectly positioned, but they should give you some idea. C has two holes in it that aren't in the picture.
The left an right brackets are mirror images of each other. Something else you need to remember, the templates have to go on the outside of the angle steel. See where the arrows in the second pictures are pointing? Thats where the templates have to go. In you put them on the inside of the angle, everything will be off by 1/4"
Update 7-14-00: Pics! Sorry, they aren't thumbnails yet.
Chrome. I use a strip of velcro wraped around the lever and bar as a parking brake, you can see it there on teh crossbar pad.